

Oqib yonuvchi LEDlar
Oqimli LEDlarni yaratish uchun Chiqishli massivdan foydalanish
Ushbu bobda biz "oqadigan" effekt yaratish uchun bir nechta GPIO pinlaridan foydalanamiz ularni ketma-ket yoqish va o‘chirish.
Bizga nima kerak?
Buning uchun sizga kerak:
- Node.js o‘rnatilgan Raspian, internet, SSH bilan Raspberry Pi
- Node.js uchun o‘chirish moduli
- 1 x Breadboard
- 8 x 220 Ohm qarshilik
- 8 x Teshik orqali LED
- 9 x Ayoldan erkakka o‘tkazgich simlari
Eslatma: Sizga kerak bo‘lgan rezistor siz foydalanadigan LED turiga qarab biz foydalanadigan narsadan farq qilishi mumkin. Ko‘pgina kichik LEDlar faqat 200-500 ohm atrofida kichik qarshilikka muhtoj. Qaysi qiymatdan foydalanayotganingiz umuman muhim emas, lekin rezistorning qiymati qanchalik kichik bo‘lsa, LED shunchalik yorqinroq bo‘ladi. porlash.
Turli xil tavsiflar uchun yuqoridagi ro‘yxatdagi havolalarni bosing komponentlar.
Sxemani qurish
Endi bizning Breadboardimizda sxemani qurish vaqti keldi.
Agar siz elektronika uchun yangi bo‘lsangiz, quvvatni o‘chirishni tavsiya qilamiz Raspberry Pi. Bunga yo‘l qo‘ymaslik uchun antistatik mat yoki topraklama tasmasini ishlating unga zarar yetkazish.
Raspberry Pi-ni buyruq bilan to‘g‘ri o‘chiring:
pi@w3demopi:~ $ sudo shutdown -h now
Raspberry Pi’dagi LED’lar miltillashdan to‘xtagach, Raspberry Pi’dan quvvat vilkasini sug‘urib oling (yoki u ulangan uzatkichni o‘chiring).
To‘g‘ri o‘chirmasdan vilkadan tortib olish xotira kartasining buzilishiga olib kelishi mumkin.
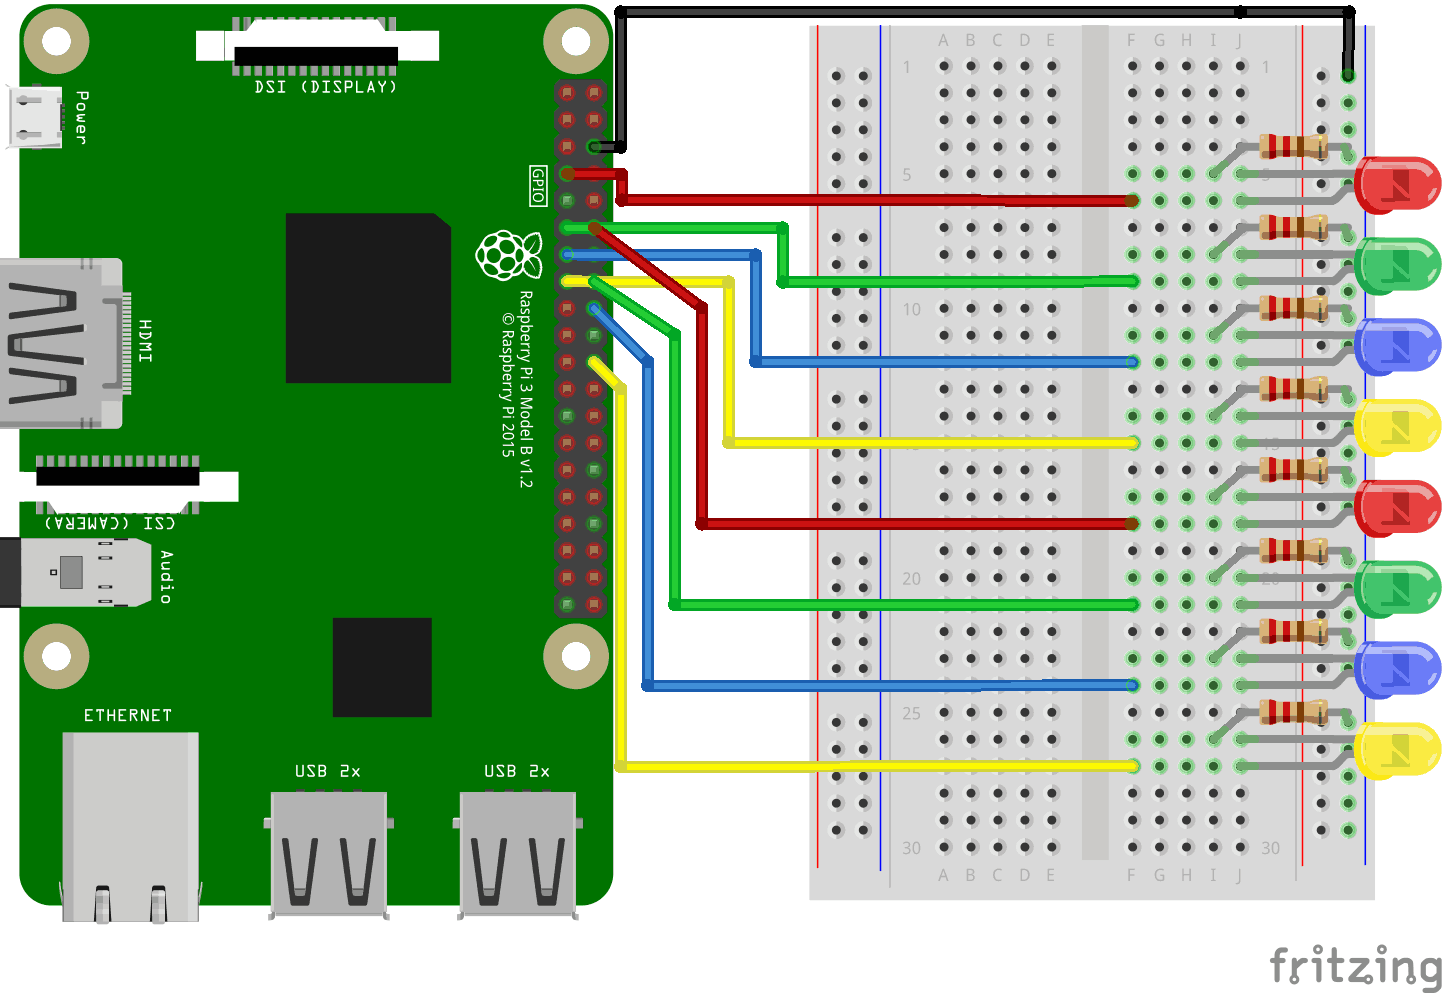
Yuqoridagi sxema rasmiga qarang.
- Raspberry Pi’da jumper simining ona (female) uchini GND piniga ulang. Misolimizda biz 6-fizik pindan foydalandik (GND, 3-qator, o‘ng ustun)
- Breadboardda ulangan o‘tish simining erkak oyog‘ini ulang GND quvvati, o‘ng tarafdagi Yer avtobusiga. Butun ustun non taxtasi ulangan, shuning uchun qaysi qator muhim emas. Bizning misolimizda biz uni 1-qatorga biriktirdik
- For each LED: Connect the LED so that it connects to 2 Tie-Point rows. In our example
we connected:
- LED1-dan 5-qator (katod) va 6-qator (anod) ustuni J
- LED2 dan 8-qator (katod) va 9-qator (anod) ustuni J
- LED3 dan 11-qator (katod) va 12-qator (anod) J ustuniga
- LED4 dan 14-qator (katod) va 15-qator (anod) ustuni J
- LED5 dan 17-qatorga (katod) va 18 (anod) ustuni J
- LED6 dan 20-qator (katod) va 21 (anod) ustuniga J
- LED7-dan 23-qator (katod) va 24-qator (anod) ustuni J
- LED8-dan 26-qator (katod) va 27-qator (anod) ustuni J
- For each LED: Connect one of the legs of a 220 ohm resistor from the the Ground Bus
column on the right side, and the other leg to the right side Tie-Point row
where it connects to the cathode leg of the LED. In our example we
connected:
- LED1 dan 5-qatorga I ustun
- LED2 dan 8-qatorga I ustun
- LED3 dan 11-qatorga I ustun
- LED4 dan 14-qatorga I ustun
- LED5 dan 17-qatorga I ustun
- LED6 dan 20-qatorga I ustun
- LED7 dan 23-qatorga I ustun
- LED8 dan 26-qatorga I ustun
- For each LED: Connect the female leg of a jumper wire to a
GPIO pin on the Raspberry Pi, and the male leg
of the jumper wire to the right side Tie-Point row
where it connects to the anode leg of the LED. In our example we connected:
- LED1: 7-fizik pindan (GPIO 4, 4-qator, chap ustun) Tie-point 6-qator F ustunga
- LED2: 11-fizik pindan (GPIO 17, 6-qator, chap ustun) Tie-point 9-qator F ustunga
- LED3: 13-fizik pindan (GPIO 27, 7-qator, chap ustun) Tie-point 12-qator F ustunga
- LED4: 15-fizik pindan (GPIO 22, 8-qator, chap ustun) Tie-point 15-qator F ustunga
- LED5: 12-fizik pindan (GPIO 18, 6-qator, o‘ng ustun) Tie-point 18-qator F ustunga
- LED6: 16-fizik pindan (GPIO 23, 8-qator, o‘ng ustun) Tie-point 21-qator F ustunga
- LED7: 18-fizik pindan (GPIO 24, 9-qator, o‘ng ustun) Tie-point 24-qator F ustunga
- LED8: 22-fizik pindan (GPIO 25, 11-qator, o‘ng ustun) Tie-point 27-qator F ustunga
Sizning sxemangiz endi tugallangan bo‘lishi kerak va ulanishlaringiz ko‘rinishi kerak yuqoridagi rasmga juda o‘xshash.
Endi Raspberry Pi-ni ishga tushirish va Node.js skriptini yozish vaqti keldi u bilan o‘zaro aloqada bo‘ling.
Raspberry Pi va Node.js Flowing LEDs skripti
"Nodetest" katalogiga o‘ting va "flowingleds.js" nomli yangi fayl yarating:
pi@w3demopi:~ $ nano flowingleds.js
Fayl endi ochiq va uni o‘rnatilgan Nano muharriri bilan tahrirlash mumkin.
Quyidagilarni yozing yoki joylashtiring:
flowingleds.js
let Gpio = require('onoff').Gpio; //include onoff to interact with the GPIO
let LED04 = new Gpio(4, 'out'), //use declare variables for all the GPIO
output pins
LED17 = new Gpio(17, 'out'),
LED27 = new Gpio(27,
'out'),
LED22 = new Gpio(22, 'out'),
LED18 = new Gpio(18,
'out'),
LED23 = new Gpio(23, 'out'),
LED24 = new Gpio(24,
'out'),
LED25 = new Gpio(25, 'out');
//Put all the LED
variables in an array
let leds = [LED04,
LED17, LED27, LED22, LED18, LED23, LED24, LED25];
let indexCount = 0; //a
counter
dir = "up"; //variable for flowing direction
let
flowInterval = setInterval(flowingLeds, 100); //run the flowingLeds function
every 100ms
function flowingLeds() { //function for flowing Leds
leds.forEach(function(currentValue) { //for each item in array
currentValue.writeSync(0); //turn off LED
});
if (indexCount
== 0) dir = "up"; //set flow direction to "up" if the count reaches zero
if (indexCount >= leds.length) dir = "down"; //set flow direction to "down" if
the count reaches 7
if (dir == "down") indexCount--; //count
downwards if direction is down
leds[indexCount].writeSync(1);
//turn on LED that where array index matches count
if (dir ==
"up") indexCount++ //count upwards if direction is up
};
function unexportOnClose() {
//function to run when exiting program
clearInterval(flowInterval);
//stop flow interwal
leds.forEach(function(currentValue) { //for
each LED
currentValue.writeSync(0); //turn off LED
currentValue.unexport(); //unexport GPIO
});
};
process.on('SIGINT', unexportOnClose); //function to
run when user closes using ctrl+cc
Kodni saqlash uchun "Ctrl+x" tugmasini bosing. "y" bilan tasdiqlang va ismni "Enter" bilan tasdiqlang.
Kodni ishga tushiring:
pi@w3demopi:~ $ node flowingleds.js
Endi LEDlar ketma-ket yoqilishi va o‘chirilishi, stream effektini yaratishi kerak.
Dasturni Ctrl+c bilan yakunlang.
W3Schools Pathfinder
Yutuqlaringizni kuzating – bu bepul!