

Vue hayotiy sikl hooklari
Vue-dagi lifecycle hook’lari — komponent lifecycle (hayotiy sikl) davomidagi muayyan bosqichlar bo‘lib, ularda biror amalni bajarish uchun kod qo‘shishimiz mumkin.
Lifecycle (hayotiy sikl) hook’lari
Komponent o‘z lifecycle’ining (hayotiy siklining) yangi bosqichiga har safar yetganda ma’lum bir funksiya ishga tushadi va biz shu funksiyaga kod qo‘shishimiz mumkin. Bunday funksiyalar lifecycle hook’lari deb ataladi, chunki biz o‘z kodimizni shu bosqichga "ulashimiz" (hook qilishimiz) mumkin.
Komponentning barcha lifecycle hook’lari quyidagilar:
- beforeCreate
- created
- beforeMount
- mounted
- beforeUpdate
- updated
- beforeUnmount
- unmounted
- errorCaptured
renderTrackedrenderTriggered- activated
- deactivated
serverPrefetch
Quyida ushbu lifecycle hook’lariga misollar keltirilgan.
"beforeCreate" hook’i
beforeCreate lifecycle hook’i komponent ishga tushirilishidan (initsializatsiyadan) oldin ishlaydi, ya’ni Vue komponentning ma’lumotlari (data), hisoblangan (computed) xususiyatlari, metodlari (methods) va hodisa tinglovchilarini (event listeners) sozlashidan oldin.
beforeCreate hook’idan, masalan, global hodisa (event) tinglovchisini o‘rnatish uchun foydalanish mumkin, lekin beforeCreate lifecycle hook’idan komponentga tegishli ma’lumotlar (data), kuzatuvchilar (watchers) va metodlar (methods) kabi elementlarga murojaat qilishga urinmasligimiz kerak, chunki ular bu bosqichda hali yaratilmagan.
Shuningdek, beforeCreate lifecycle hook’idan DOM elementlariga murojaat qilishga urinish ma’nosiz, chunki ular komponent DOMga o‘rnatilmaguncha (mounted) yaratilmaydi.
Misol
CompOne.vue:
<template>
    <h2>Component</h2>
    <p>This is the component</p>
    <p id="pResult">{{ text }}</p>
</template>

<script>
export default {
	data() {
		return {
			text: '...'
		}
	},
  beforeCreate() {
		this.text = 'initial text'; // This line has no effect
    console.log("beforeCreate: The component is not created yet.");
  }
}
</script>
App.vue:
<template>
  <h1>The 'beforeCreate' Lifecycle Hook</h1>
  <p>We can see the console.log() message from 'beforeCreate' lifecycle hook, but there is no effect from the text change we try to do to the Vue data property, because the Vue data property is not created yet.</p>
  <button @click="this.activeComp = !this.activeComp">Add/Remove Component</button>
  <div>
    <comp-one v-if="activeComp"></comp-one>
  </div>
</template>

<script>
export default {
  data() {
    return {
      activeComp: false
    }
  }
}
</script>

<style>
#app > div {
  border: dashed black 1px;
  border-radius: 10px;
  padding: 10px;
  margin-top: 10px;
  background-color: lightgreen;
}
#pResult {
  background-color: lightcoral;
  display: inline-block;
}
</style>
Yuqoridagi misolda CompOne.vue’dagi 15-qator hech qanday ta’sir qilmaydi, chunki bu qatorda biz Vue data xususiyati ichidagi matnni o‘zgartirishga harakat qilamiz, lekin Vue data xususiyati aslida hali yaratilmagan. Shuningdek, 16-qatordagi console.log() chaqiruvi natijasini ko‘rish uchun brauzer konsolini ochishni unutmang.
"created" hook’i
created lifecycle hook’i komponent ishga tushirilgandan so‘ng ishlaydi, ya’ni bu paytda Vue komponentning ma’lumotlari (data), hisoblangan (computed) xususiyatlari, metodlari (methods) va hodisa tinglovchilarini allaqachon sozlab bo‘lgan.
created lifecycle hook’idan DOM elementlariga murojaat qilishga urinmasligimiz kerak, chunki komponent DOMga o‘rnatilmaguncha (mounted) DOM elementlariga murojaat qilib bo‘lmaydi.
created lifecycle hook’i HTTP so‘rovlari orqali ma’lumotlarni olish yoki ma’lumotlarning boshlang‘ich qiymatlarini o‘rnatish uchun ishlatilishi mumkin. Quyidagi misolda bo‘lgani kabi, "text" data xususiyatiga boshlang‘ich qiymat beriladi:
Misol
CompOne.vue:
<template>
    <h2>Component</h2>
    <p>This is the component</p>
    <p id="pResult">{{ text }}</p>
</template>

<script>
export default {
	data() {
		return {
			text: '...'
		}
	},
  created() {
		this.text = 'initial text';
    console.log("created: The component just got created.");
  }
}
</script>
App.vue:
<template>
  <h1>The 'created' Lifecycle Hook</h1>
  <p>We can see the console.log() message from 'created' lifecycle hook, and the text change we try to do to the Vue data property works, because the Vue data property is already created at this stage.</p>
  <button @click="this.activeComp = !this.activeComp">Add/Remove Component</button>
  <div>
    <comp-one v-if="activeComp"></comp-one>
  </div>
</template>

<script>
export default {
  data() {
    return {
      activeComp: false
    }
  }
}
</script>

<style>
#app > div {
  border: dashed black 1px;
  border-radius: 10px;
  padding: 10px;
  margin-top: 10px;
  background-color: lightgreen;
}
#pResult {
  background-color: lightcoral;
  display: inline-block;
}
</style>
"beforeMount" hook’i
beforeMount lifecycle hook’i komponent o‘rnatilishidan (mounted) bevosita oldin, ya’ni komponent DOMga qo‘shilishidan sal oldin ishga tushadi.
beforeMount lifecycle hook’idan DOM elementlariga murojaat qilishga urinmasligimiz kerak, chunki komponent DOMga o‘rnatilmaguncha (mounted) DOM elementlariga murojaat qilib bo‘lmaydi.
Quyidagi misol komponentdagi DOM elementlariga hali murojaat qila olmasligimizni ko‘rsatadi: CompOne.vue’dagi 11-qator ishlamaydi va brauzer konsolida xatolik hosil qiladi:
Misol
CompOne.vue:
<template>
    <h2>Component</h2>
    <p>This is the component</p>
    <p ref="pEl" id="pEl">We try to access this text from the 'beforeMount' hook.</p>
</template>

<script>
export default {
  beforeMount() {
    console.log("beforeMount: This is just before the component is mounted.");
    this.$refs.pEl.innerHTML = "Hello World!"; // <-- We cannot reach the 'pEl' DOM element at this stage
  }
}
</script>
App.vue:
<template>
  <h1>The 'beforeMount' Lifecycle Hook</h1>
  <p>We can see the console.log() message from the 'beforeMount' lifecycle hook, but the text change we try to do to the 'pEl' paragraph DOM element does not work, because the 'pEl' paragraph DOM element does not exist yet at this stage.</p>
  <button @click="this.activeComp = !this.activeComp">Add/Remove Component</button>
  <div>
    <comp-one v-if="activeComp"></comp-one>
  </div>
</template>

<script>
export default {
  data() {
    return {
      activeComp: false
    }
  }
}
</script>

<style>
#app > div {
  border: dashed black 1px;
  border-radius: 10px;
  padding: 10px;
  margin-top: 10px;
  background-color: lightgreen;
}
#pEl {
  background-color: lightcoral;
  display: inline-block;
}
</style>
"mounted" hook’i
Komponent DOM daraxtiga qo‘shilgandan so‘ng, mounted() funksiyasi chaqiriladi va biz o‘z kodimizni ushbu bosqichga qo‘shishimiz mumkin.
Bu — komponentga tegishli DOM elementlari bilan bog‘liq ishlarni bajarish uchun bizga beriladigan birinchi imkoniyat, masalan, quyidagi ikkinchi misolda bo‘lgani kabi ref atributi va $refs obyektidan foydalanish.
Misol
CompOne.vue:
<template>
  <h2>Component</h2>
  <p>Right after this component is added to the DOM, the mounted() function is called and we can add code to that mounted() function. In this example, an alert popup box appears after this component is mounted.</p>
  <p><strong>Note:</strong> The reason that the alert is visible before the component is visible is because the alert is called before the browser gets to render the component to the screen.</p>
</template>

<script>
export default {
  mounted() {
    alert("The component is mounted!");
  }
}
</script>
App.vue:
<template>
  <h1>The 'mounted' Lifecycle Hook</h1>
  <button @click="this.activeComp = !this.activeComp">Create component</button>
  <div>
    <comp-one v-if="activeComp"></comp-one>
  </div>
</template>

<script>
export default {
  data() {
    return {
      activeComp: false
    }
  }
}
</script>

<style scoped>
  div {
    border: dashed black 1px;
    border-radius: 10px;
    padding: 20px;
    margin: 10px;
    width: 400px;
    background-color: lightgreen;
  }
</style>
Eslatma: mounted bosqichi komponent DOMga qo‘shilgandan KEYIN sodir bo‘ladi, lekin yuqoridagi misolda alert() komponentni ko‘rishimizdan OLDIN paydo bo‘ladi. Buning sababi shundaki, avval komponent DOMga qo‘shiladi, ammo brauzer komponentni ekranga render qilishga ulgurmasidan oldin mounted bosqichi sodir bo‘ladi, alert() paydo bo‘ladi va brauzerning komponentni render qilishini to‘xtatib turadi.
Quyida, ehtimol, foydaliroq misol keltirilgan: forma komponenti DOMga o‘rnatilgandan (mounted) so‘ng kursorni input maydoni ichiga qo‘yish, shunda foydalanuvchi darhol yozishni boshlashi mumkin.
Misol
CompOne.vue:
<template>
  <h2>Form Component</h2>
  <p>When this component is added to the DOM tree, the mounted() function is called, and we put the cursor inside the input element.</p>
  <form @submit.prevent>
    <label>
      <p>
        Name: <br>
        <input type="text" ref="inpName">
      </p>
    </label>
    <label>
      <p>
        Age: <br>
        <input type="number">
      </p>
    </label>
    <button>Submit</button>
  </form>
  <p>(This form does not work, it is only here to show the mounted lifecycle hook.)</p>
</template>

<script>
  export default {
    mounted() {
      this.$refs.inpName.focus();
    }
  }
</script>
"beforeUpdate" hook’i
beforeUpdate lifecycle hook’i komponentimiz ma’lumotlarida o‘zgarish yuz berganda, lekin yangilanish ekranga render qilinishidan oldin chaqiriladi. beforeUpdate lifecycle hook’i updated lifecycle hook’idan bevosita oldin ishga tushadi.
beforeUpdate hook’ining o‘ziga xos jihati shundaki, unda ilovaga o‘zgartirish kiritsak ham yangi yangilanish ishga tushmaydi, shu tariqa aks holda yuzaga keladigan cheksiz sikldan qochamiz. updated lifecycle hook’ida ilovaga o‘zgartirish kiritmaslikning sababi ham shu: bu hook’da cheksiz sikl hosil bo‘ladi. Quyidagi uchinchi misolga (qizil rangda) qarang.
Misol
beforeUpdate() funksiyasi beforeUpdate() funksiyasi ishga tushganligini ko‘rsatish uchun hujjatga <li> tegini qo‘shadi.
CompOne.vue:
<template>
  <h2>Component</h2>
  <p>This is the component</p>
</template>
App.vue:
<template>
  <h1>The 'beforeUpdate' Lifecycle Hook</h1>
  <p>Whenever there is a change in our page, the application is 'updated' and the 'beforeUpdate' hook happens just before that.</p>
  <p>It is safe to modify our page in the 'beforeUpdate' hook like we do here, but if we modify our page in the 'updated' hook, we will generate an infinite loop.</p>
  <button @click="this.activeComp = !this.activeComp">Add/Remove Component</button>
  <div>
    <comp-one v-if="activeComp"></comp-one>
  </div>
  <ol ref="divLog"></ol>
</template>

<script>
export default {
  data() {
    return {
      activeComp: true
    }
  },
  beforeUpdate() {
    this.$refs.divLog.innerHTML += "<li>beforeUpdate: This happened just before the 'updated' hook.</li>";
  }
}
</script>

<style>
#app > div {
  border: dashed black 1px;
  border-radius: 10px;
  padding: 10px;
  margin-top: 10px;
  background-color: lightgreen;
}
</style>
"updated" hook’i
updated lifecycle hook’i komponentimiz o‘zining DOM daraxtini yangilagandan so‘ng chaqiriladi.
Misol
updated() funksiyasi console.log() yordamida xabar yozadi. Bu sahifa har safar yangilanganda sodir bo‘ladi, bu misolda esa — har safar komponent qo‘shilganda yoki olib tashlanganda.
CompOne.vue:
<template>
  <h2>Component</h2>
  <p>This is the component</p>
</template>
App.vue:
<template>
  <h1>The 'updated' Lifecycle Hook</h1>
  <p>Whenever there is a change in our page, the application is updated and the updated() function is called. In this example we use console.log() in the updated() function that runs when our application is updated.</p>
  <button @click="this.activeComp = !this.activeComp">Add/Remove Component</button>
  <div>
    <comp-one v-if="activeComp"></comp-one>
  </div>
</template>

<script>
export default {
  data() {
    return {
      activeComp: true
    }
  },
  updated() {
    console.log("The component is updated!");
  }
}
</script>

<style>
#app {
  max-width: 450px;
}
#app > div {
  border: dashed black 1px;
  border-radius: 10px;
  padding: 10px;
  margin-top: 10px;
  width: 80%;
  background-color: lightgreen;
}
</style>
Natijani brauzer konsolida "Komponentni qo‘shish/o‘chirish" tugmasini 10 marta bosgandan so‘ng ko‘rishimiz mumkin:
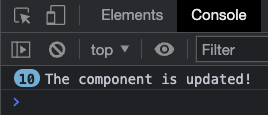
Eslatma: updated lifecycle hook’i chaqirilganda sahifaning o‘zini o‘zgartirmaslikka ehtiyot bo‘lishimiz kerak, aks holda sahifa qayta-qayta yangilanib, cheksiz sikl hosil bo‘ladi.
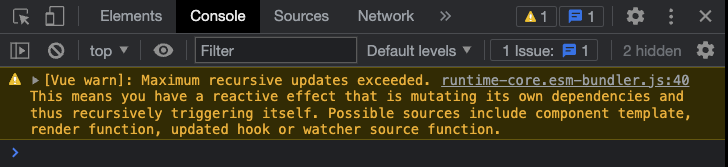
Keling, yuqoridagi eslatma aynan nimadan ogohlantirgan bo‘lsa, shuni qilsak nima bo‘lishini ko‘rib chiqaylik. Sahifa cheksiz yangilanaveradimi?:
Misol
updated() funksiyasi xatboshiga matn qo‘shadi, bu esa o‘z navbatida sahifani yana yangilaydi va funksiya cheksiz siklda qayta-qayta ishlaydi. Yaxshiyamki, brauzeringiz bu siklni oxir-oqibat to‘xtatadi.
CompOne.vue:
<template>
  <h2>Component</h2>
  <p>This is the component</p>
</template>
App.vue:
<template>
  <h1>The 'updated' Lifecycle Hook</h1>
  <p>Whenever there is a change in our page, the application is updated and the updated() function is called.</p>
  <p>The first change that causes the updated hook to be called is when we remove the component by clicking the button. When this happens, the update() function adds text to the last paragraph, which in turn updates the page again and again.</p>
  <button @click="this.activeComp = !this.activeComp">Add/Remove Component</button>
  <div>
    <comp-one v-if="activeComp"></comp-one>
  </div>
  <div>{{ text }}</div>
</template>

<script>
export default {
  data() {
    return {
      activeComp: true,
      text: "Hello, "
    }
  },
  updated() {
    this.text += "hi, ";
  }
}
</script>

<style>
#app {
  max-width: 450px;
}
#app > div {
  border: dashed black 1px;
  border-radius: 10px;
  padding: 10px;
  margin-top: 10px;
  width: 80%;
  background-color: lightgreen;
}
</style>
Yuqoridagi kodni kompyuteringizda ishlab chiqish (dev) rejimida lokal ishga tushirganingizda, Chrome brauzer konsolidagi ogohlantirish quyidagicha ko‘rinadi:
"beforeUnmount" hook’i
beforeUnmount lifecycle hook’i komponent DOMdan olib tashlanishidan bevosita oldin chaqiriladi.
Quyidagi misolda ko‘rib turganimizdek, beforeUnmount hook’ida DOMdagi komponent elementlariga hali ham murojaat qilishimiz mumkin.
Misol
CompOne.vue:
<template>
  <h2>Component</h2>
  <p ref="pEl">Strawberries!</p>
</template>

<script>
export default {
  beforeUnmount() {
    alert("beforeUnmount: The text inside the p-tag is: " + this.$refs.pEl.innerHTML);
  }
}
</script>
App.vue:
<template>
  <h1>Lifecycle Hooks</h1>
  <button @click="this.activeComp = !this.activeComp">{{ btnText }}</button>
  <div>
    <comp-one v-if="activeComp"></comp-one>
  </div>
</template>

<script>
export default {
  data() {
    return {
      activeComp: true
    }
  },
  computed: {
    btnText() {
      if(this.activeComp) {
        return 'Remove component'
      }
      else {
        return 'Add component'
      }
    }
  }
}
</script>

<style scoped>
  div {
    border: dashed black 1px;
    border-radius: 10px;
    padding: 20px;
    margin: 10px;
    width: 400px;
    background-color: lightgreen;
  }
</style>
"unmounted" hook’i
unmounted lifecycle hook’i komponent DOMdan olib tashlangandan keyin chaqiriladi.
Bu hook, masalan, hodisa tinglovchilarini (event listeners) olib tashlash yoki taymer va intervallarni bekor qilish uchun ishlatilishi mumkin.
Komponent DOMdan olib tashlanganda (unmounted) unmounted() funksiyasi chaqiriladi va unga o‘z kodimizni qo‘shishimiz mumkin:
Misol
CompOne.vue:
<template>
  <h2>Component</h2>
  <p>When this component is removed from the DOM tree, the unmounted() function is called and we can add code to that function. In this example we create an alert popup box when this component is removed.</p>
</template>

<script>
export default {
  unmounted() {
    alert("The component is removed (unmounted)!");
  }
}
</script>
App.vue:
<template>
  <h1>Lifecycle Hooks</h1>
  <button @click="this.activeComp = !this.activeComp">{{ btnText }}</button>
  <div>
    <comp-one v-if="activeComp"></comp-one>
  </div>
</template>

<script>
export default {
  data() {
    return {
      activeComp: true
    }
  },
  computed: {
    btnText() {
      if(this.activeComp) {
        return 'Remove component'
      }
      else {
        return 'Add component'
      }
    }
  }
}
</script>

<style scoped>
  div {
    border: dashed black 1px;
    border-radius: 10px;
    padding: 20px;
    margin: 10px;
    width: 400px;
    background-color: lightgreen;
  }
</style>
Eslatma: unmounted bosqichi komponent DOMdan olib tashlangandan KEYIN sodir bo‘ladi, lekin yuqoridagi misolda alert() komponent yo‘qolishidan OLDIN paydo bo‘ladi. Buning sababi shundaki, avval komponent DOMdan olib tashlanadi, ammo brauzer komponentning olib tashlanishini ekranga render qilishga ulgurmasidan oldin unmounted bosqichi sodir bo‘ladi, alert() paydo bo‘ladi va brauzerning komponentni ko‘rinadigan tarzda olib tashlashini to‘xtatib turadi.
"errorCaptured" hook’i
errorCaptured lifecycle hook’i bola/avlod komponentda xatolik yuz berganda chaqiriladi.
Ushbu hook xatolarni qayta ishlash (error handling), log yozish yoki xatoni foydalanuvchiga ko‘rsatish uchun ishlatilishi mumkin.
Misol
CompOne.vue:
<template>
  <h2>Component</h2>
  <p>This is the component</p>
  <button @click="generateError">Generate Error</button>
</template>

<script>
export default {
  methods: {
    generateError() {
      this.$refs.objEl.innerHTML = "hi";
    }
  }
}
</script>
App.vue:
<template>
  <h1>The 'errorCaptured' Lifecycle Hook</h1>
  <p>Whenever there is an error in a child component, the errorCaptured() function is called on the parent.</p>
  <p>When the button inside the component is clicked, a method will run that tries to do changes to a $refs object that does not exist. This creates an error in the component that triggers the 'errorCaptured' lifecycle hook in the parent, and an alert box is displayed with information about the error.</p>
  <p>After clicking "Ok" in the alert box you can see the error in the browser console.</p>
  <div>
    <comp-one></comp-one>
  </div>
</template>

<script>
export default {
  errorCaptured() {
    alert("An error occurred");
  }
}
</script>

<style>
#app > div {
  border: dashed black 1px;
  border-radius: 10px;
  padding: 10px;
  margin-top: 10px;
  background-color: lightgreen;
}
</style>
Xato haqidagi ma’lumotni errorCaptured() funksiyasiga argument sifatida ham olish mumkin va bu argumentlar:
- Xato
- Xatoni keltirib chiqargan komponent
- Xato manbai turi
Quyidagi misolda bu argumentlar errorCaptured() funksiyasida qabul qilinadi va konsolga yoziladi:
Misol
CompOne.vue:
<template>
  <h2>Component</h2>
  <p>This is the component</p>
  <button @click="generateError">Generate Error</button>
</template>

<script>
export default {
  methods: {
    generateError() {
      this.$refs.objEl.innerHTML = "hi";
    }
  }
}
</script>
App.vue:
<template>
  <h1>The 'errorCaptured' Lifecycle Hook</h1>
  <p>Whenever there is an error in a child component, the errorCaptured() function is called on the parent.</p>
  <p>Open the browser console to see the captured error details.</p>
  <div>
    <comp-one></comp-one>
  </div>
</template>

<script>
export default {
  errorCaptured(error,compInst,errorInfo) {
    console.log("error: ", error);
    console.log("compInst: ", compInst);
    console.log("errorInfo: ", errorInfo);
  }
}
</script>

<style>
#app > div {
  border: dashed black 1px;
  border-radius: 10px;
  padding: 10px;
  margin-top: 10px;
  background-color: lightgreen;
}
</style>
"renderTracked" va "renderTriggered" lifecycle hook’lari
renderTracked hook’i render funksiyasi reaktiv komponentni kuzatish yoki nazorat qilish uchun sozlanganda ishga tushadi. renderTracked hook’i odatda reaktiv komponent ishga tushirilganda ishlaydi.
renderTriggered hook’i shunday kuzatilayotgan reaktiv komponent o‘zgarib, ekran so‘nggi o‘zgarishlar bilan yangilanishi uchun yangi render ishga tushirilganda ishlaydi.
Reaktiv komponent o‘zgarishi mumkin bo‘lgan komponentdir.
Render funksiyasi — Vue tomonidan kompilyatsiya qilinadigan va reaktiv komponentlarni kuzatib boradigan funksiya. Reaktiv komponent o‘zgarganda render funksiyasi ishga tushadi va ilovani ekranga qayta render qiladi.
renderTracked va renderTriggered hook’lari debug qilishda foydalanish uchun mo‘ljallangan va faqat ishlab chiqish (development) rejimida mavjud.
renderTracked va renderTriggered hook’laridagi alert() va console.log() natijalarini ko‘rish uchun quyidagi misoldagi kodni kompyuteringizga nusxalab, ilovani ishlab chiqish (development) rejimida ishga tushirishingiz kerak.
Misol
CompOne.vue:
<template>
  <h2>Component One</h2>
  <p>This is a component.</p>
  <button @click="counter++">Add One</button>
  <p>{{ counter }}</p>
</template>

<script>
export default {
  data() {
    return {
      counter: 0
    }
  },
  renderTracked(evt) {
    console.log("renderTracked: ",evt);
    alert("renderTracked");
  },
  renderTriggered(evt) {
    console.log("renderTriggered: ",evt)
    alert("renderTriggered");
  }
}
</script>
App.vue:
<template>
  <h1>The 'renderTracked' and 'renderTriggered' Lifecycle Hooks</h1>
  <p>The 'renderTracked' and 'renderTriggered' lifecycle hooks are used for debugging.</p>
  <p><mark>This example only works in development mode, so to see the hooks run, you must copy this code and run it on you own computer in development mode.</mark></p>
  <div>
    <comp-one></comp-one>
  </div>
</template>

<style scoped>
  div {
    border: dashed black 1px;
    border-radius: 10px;
    padding: 20px;
    margin-top: 10px;
    background-color: lightgreen;
  }
</style>
Eslatma: Yuqoridagi misoldagi kod kompyuteringizga nusxalab olinib, ishlab chiqish (development) rejimida lokal ishga tushirilishi uchun mo‘ljallangan, chunki renderTracked va renderTriggered hook’lari faqat ishlab chiqish rejimida ishlaydi.
"activated" va "deactivated" lifecycle hook’lari
Ushbu sahifada yuqorida ko‘rganimizdek, komponent DOMga qo‘shilganda yoki undan olib tashlanganda ishlaydigan mounted va unmounted lifecycle hook’lari mavjud.
activated va deactivated lifecycle hook’lari keshlangan dinamik komponent qo‘shilganda yoki olib tashlanganda (lekin DOMdan emas) ishlaydi. Quyidagi misolda dinamik komponentni keshlash uchun <KeepAlive> tegi ishlatiladi.
Misol
CompOne.vue:
<template>
  <h2>Component</h2>
  <p>Below is a log with every time the 'mounted' or 'activated' hooks run.</p>
  <ol ref="olEl"></ol>
  <p>You can also see when these hooks run in the console.</p>
</template>

<script>
export default {
  mounted() {
    console.log("mounted");
    const liEl = document.createElement("li");
    liEl.innerHTML = "mounted";
    this.$refs.olEl.appendChild(liEl);
  },
  activated() {
    console.log("activated");
    const liEl = document.createElement("li");
    liEl.innerHTML = "activated";
    this.$refs.olEl.appendChild(liEl);
  }
}
</script>

<style>
  li {
    background-color: lightcoral;
    width: 5em;
  }
</style>
App.vue:
<template>
  <h1>The 'activated' Lifecycle Hook</h1>
  <p>In this example for the 'activated' hook we check if the component is cached properly with <KeepAlive>.</p>
  <p>If the component is cached properly with <KeepAlive> we expect the 'mounted' hook to run once the first time the component is included (must be added to the DOM the first time), and we expect the 'activated' hook to run every time the component is included (also the first time).</p>
  <button @click="this.activeComp = !this.activeComp">Include component</button>
  <div>
    <KeepAlive>
      <comp-one v-if="activeComp"></comp-one>
    </KeepAlive>
  </div>
</template>

<script>
export default {
  data() {
    return {
      activeComp: false
    }
  }
}
</script>

<style scoped>
  div {
    border: dashed black 1px;
    border-radius: 10px;
    padding: 20px;
    margin-top: 10px;
    background-color: lightgreen;
  }
</style>
Keling, activated va deactivated hook’lari qanday ishlashini ko‘rish uchun yuqoridagi misolni kengaytiramiz. mounted va unmounted hook’laridan ham foydalanamiz — shunda mounted hook’i keshlangan komponent birinchi marta qo‘shilganda bir marta ishlashini, unmounted hook’i esa keshlangan komponent uchun hech qachon ishlamasligini ko‘ramiz.
Misol
CompOne.vue:
<template>
  <h2>Component</h2>
  <p>Below is a log with every time the 'activated', 'deactivated', 'mounted' or 'unmounted' hooks run.</p>
  <ol ref="olEl"></ol>
  <p>You can also see when these hooks run in the console.</p>
</template>

<script>
export default {
  mounted() {
    this.logHook("mounted");
  },
  unmounted() {
    this.logHook("unmounted");
  },
  activated() {
    this.logHook("activated");
  },
  deactivated() {
    this.logHook("deactivated");
  },
  methods: {
    logHook(hookName) {
      console.log(hookName);
      const liEl = document.createElement("li");
      liEl.innerHTML = hookName;
      this.$refs.olEl.appendChild(liEl);
    }
  }
}
</script>

<style>
  li {
    background-color: lightcoral;
    width: 5em;
  }
</style>
App.vue:
<template>
  <h1>The 'activated' and 'deactivated' Lifecycle Hooks</h1>
  <p>In this example for the 'activated' and 'deactivated' hooks we also see when and if the 'mounted' and 'unmounted' hooks are run.</p>
  <button @click="this.activeComp = !this.activeComp">Include component</button>
  <div>
    <KeepAlive>
      <comp-one v-if="activeComp"></comp-one>
    </KeepAlive>
  </div>
</template>

<script>
export default {
  data() {
    return {
      activeComp: false
    }
  }
}
</script>

<style scoped>
  div {
    border: dashed black 1px;
    border-radius: 10px;
    padding: 20px;
    margin-top: 10px;
    background-color: lightgreen;
  }
</style>
"serverPrefetch" lifecycle hook’i
"serverPrefetch" hook’i faqat server tomonida render qilish (SSR) paytida chaqiriladi.
"serverPrefetch" hook’ini tushuntirish va unga misol tuzish nisbatan uzun kirish va sozlashni talab qiladi, bu esa ushbu darslik doirasidan tashqarida.
W3Schools Pathfinder
Yutuqlaringizni kuzating – bu bepul!